emichel6888
Go Kart Champion
- Location
- TX
How to fix/improve low/soft Brake pedal with Residual Pressure Valves
Let me start by saying that the stock brakes on this car (MK7 Golf R) are fine for street use, but the pedal is soft, and the engagement is nonlinear making it difficult to modulate for high performance driving. Even for street driving, I prefer a firm consistent linear brake pedal. In the Macan/Brembo caliper upgrade thread (link below), some folks discovered that you could edit some of the OBD settings to reduce or turn off the brake boost and hydraulic assist. I initially tried these settings with the stock calipers, and it is a significant improvement IMO. It does provide a firmer more consistent linear brake pedal, although a bit low in the pedal travel, I highly recommend those adjustments.
https://www.golfmk.com/forums/index...brembo-upgrade-thread-read-first-post.371028/
It seems that VW purposely built in brake pedal slop so the ECU has room to regulate initial braking force pedal response using this hydraulic servo assist/booster thingy. That is why the pedal is soft and difficult to regulate (“grabby”). So when you step on the pedal the car stops well, but there is very little feel, and it is difficult to modulate. Apparently, it knows better, just step on the pedal and it will figure out how much braking force you want, for you.
When you change these settings and essentially turn off those functions, you will find that even with the stock calipers the pedal has a much firmer linear feel. However, it is also at a somewhat lower point in the pedal travel because the booster/assist is no longer affecting the initial pedal response. Again, I prefer these brake assists off and highly recommend those settings. BTW these setting do not affect the adaptive cruise control or emergency brake functions.
However, I then upgraded to the Macan Brembo calipers recommended in the thread and immediately noticed it had a somewhat negative effect to the brake pedal operation. In particular, the brake pedal travel before engagement is even lower now and the initial engagement is not quite as firm. Once you reach the engagement point it works okay, and they are linear and easy to modulate, so it is not horrible, just a bit disappointing. I also found the lower pedal will pump up all the time just during normal street use. If I let the brakes rest, with my foot off the pedal for a few seconds, it goes back to a lower pedal, but pump them quickly and the pedal is noticeably higher, does this sound familiar?
I figured it was due to a mismatch of the Master Cylinder to the upgraded calipers, and short of finding a suitable MC upgrade; there was not much to be done, so just get used to it. However, I found in some sudden emergency stop situations the added delay from the longer brake pedal travel is noticeable and can even cause a very brief moment of panic.
I started investigating what was causing this issue, and what if anything I could do to fix it. First, it is a good idea to understand what causes this issue and that starts with what causes the pistons to retract when you let off the brakes. Piston retraction is a function of the inner piston seal, see pic below:

The piston seal lives in a groove in the caliper housing, and is designed to deform a little bit as pressure builds in the caliper before it allows the piston to slide. When pressure is released, the deformed seal retracts back to its original shape, pulling the piston back with it. The deformation allows running clearance off-brake, and the sliding allows compensation for pad wear.
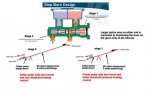
Most brake systems have little to no residual pressure, when you let off the brakes the pistons retract and the fluid is pushed back into the reservoir. When you apply the brakes the MC has to push enough fluid to pressurize the system and move the pistons up enough for the pads to contact the rotor before the car will even begin to brake. To help do this some performance disk brake systems use a stepped bore MC (Also referred to as a Quick take up MC, see pic below). As you can see, at the initial brake pedal movement it uses a larger piston to force a greater quantity of fluid to overcome this brake resting state. Then as you press further, the larger piston is closed off and the smaller piston provides greater force ideally at the point where the pad/rotor is fully engaged.

UPDATE: My original theory on why this works so well involved the MC being a stepped QTMC which I have discovered is not the case. After doing more research I discovered the real reason this works so well. Rather than reposting it, you can read about it here: Why and how it works
All this helps to illustrate why you have to be careful when adding larger calipers with 8 pistons or 12 depending on which BBK you choose. You want to make sure the caliper piston displacement is the same or even less than the stock calipers. Otherwise, you could end up with a much lower softer brake pedal engagement because the stock MC does not move enough fluid to pressurize and move all of those pistons in far enough for quick pad/rotor engagement. This is what can cause the need to press the brake pedal much further down before engagement giving a low and softer initial brake pedal feel. Once you get there it is fine, but by then the travel and pedal response is less than ideal.
Another factor could be the caliper type. There is a so-called standard caliper, or one that is called a “low-drag caliper” (see pic below). We have confirmed that these Macan calipers are in fact low drag calipers. They have very similar displacement to the stock calipers, but because they retract even further, more fluid is required for pad/rotor engagement, and this causes a lower/softer pedal. This is also what causes the pedal to pump up, if you pump the brake the pistons do not fully retract but when you momentarily lift off the brake pedal you pull in more fluid from the reservoir and…

This is also why you need to be careful about replacing those inner seals, and what material you choose. It can have a much bigger impact on the overall brake performance than you might think. For example, a softer material would distort more causing more piston retraction. So just changing the seals, or worn damaged heat cycled seals can significantly affect the brake pedal engagement, even if they are not leaking. This is why you want to rebuild them periodically with heavy track use, even if they are not leaking.
Here are some values for reference:
The Stock caliper piston is 60 mm giving a displacement area of 2827 mm and a retraction of .012"
The Macan caliper pistons are 42 mm giving a displacement area of 2770 mm and a retraction of .016
The ST40 caliper pistons are 34 and 40mm giving a displacement area of 2160 mm and have standard caliper retraction, I would guess around .01. This explains why the ST40 would have a nice firm high pedal. (Especially if you turn off the brake assist features)
The ST60 caliper pistons are 30, 34, 34 mm giving a displacement area of 2500 mm and standard piston retraction.
For reference:
http://www.remaninc.com/pdfs/lowdragcalipers.pdf
A low drag caliper retracts .020-.025" after the brakes are released. A regular caliper retracts about .005-.010" You would not think that's much, but with a 1" bore master cylinder that .025" on each caliper turns into almost 1/4" of piston travel at the master cylinder just to get the pads to touch the rotor. With a 6:1 pedal that is 1.5" of pedal travel before you even start to build pressure. Add the amount of pedal travel it takes to actuate the rear brakes and take up slop in the linkages, brackets, etc, and the pedal starts getting real close to the floor.
You can see it does not take much to have a big impact on pedal engagement height, as little as .25 MM of piston retraction can make a very large difference in pedal height.
So now that we know what is happening and why, what is the easiest and cheapest way to fix it? A larger or two-step quick take up master cylinder would work great. Unfortunately, I could not find one that will fit in this application, so the answer is a device known as a Residual Pressure Valve (RPV). Product description:
“A residual pressure valve ensures that you will have a high, firm pedal next time you press the brake pedal.
Ever had problems with a low spongy pedal or slow, unresponsive brakes? If so, you may need a residual pressure valve installed in your brake line. A redesidual valve acts like a one-way or check valve to maintain brake system pressure to eliminate the problems of a low spongy pedal. This 2 PSI residual valve is installed inline between the master cylinder and brake wheel cylinders to keep 2 PSI of residual 2 PSI at the wheel cylinder for disc brakes. This ensures that you will have a high, firm pedal next time you press the brake pedal.”
I initially installed these RPV’s on my car right at the MC and I have to say that it exceeded my expectations! The brake pedal was always firm and very high with outstanding modulation. The instant you touch the brake pedal the brakes are right their ready to go! It was just about perfect. This is what it looked like:

Unfortunately, I found that the stock rear calipers are not low drag and the added residual pressure was causing the rear pads to drag. Not a lot, but enough that this was not a viable long-term solution. So the alternative was to install the RPV’s in the front wheel wells to only counteract the effect of these Macan low drag calipers.
Does it work? Yes, is it as awesome as when I had them right off the MC? Sadly no, it does get you back to the stock caliper pedal height and eliminates the brake pedal pump up. So you do get a higher firmer brake pedal with good feel and modulation so definitely worth doing IMO. It is just more of a subtle improvement than the night and day difference with my initial modification, oh well. It should also help prevent pad knock which is an issue you can experience under certain track conditions (not on the street).
UPDATE!
As mentioned above, I was not entirely happy with the wheel well RPV, so I did some more testing and tinkering, and… Eureka! The short story is: all you need to do is install the RPV’s as shown below and then just lube the piston seals; that is it! The firm high pedal with instant response is back, I am extremely happy! There is much to explain and more pictures needed, but I am only allowed 10 pics per post so I will add the stage two details into one of my responses further down page one of this thread.
Here is the modification that works without causing pad drag:
Parts needed:
1. 2X 2 PSI Residual Pressure Valve (RPV) https://www.summitracing.com/parts/wil-260-13706?rrec=true
2. 1X Thread Sealant for NPT fitting https://www.summitracing.com/parts/ptx-59214
3. 2X Hydraulic Fitting Metric M10 M10X1 M10X1.0 Male Flat to Flare Steel https://www.fittings.space/gsm23-m10x10m-m10x10mf
4. 2X Male 1/8“ NPT x M10X1 M10 Female Pipe Fitting Connector Adaptor https://www.fittings.space/gbm2p-02zm-m10x10f
5. 2X EMPI 18-1102 BRAKE LINE FITTING x2 MALE 1/8"NPT FEMALE 10MM X 1.0 BUBBLE FLARE https://www.ebay.com/itm/EMPI-18-1102-BRAKE-LINE-FITTING-x2-MALE-1-8-NPT-FEMALE-10MM-X-1-0-BUBBLE-FLARE/264218456228?ssPageName=STRK:MEBIDX:IT&_trksid=p2057872.m2749.l2649
6. 1X 1 in. x 48 in. Aluminum Flat Bar with 1/8 in. Thick https://www.homedepot.com/p/Everbil...m-Flat-Bar-with-1-8-in-Thick-801927/204274000
7. 2X 7/16” to ½” by 1” bolt, nut and washer hardware store
1. $36
2. $5
3. $14
4. $14
5. $12
6. $11
7. $8
Total $100
You will also need some brake fluid, a 28” long 2 x 4, brake bleed setup, drill, metal cutting saw, sander/grinder, wrench…

Step by step:
1. Assemble the fittings onto the RPV’s using thread sealant on the NPT fittings. Keep the first 1-2 threads clean, the EMPI 18-1102 fitting is tapered so doesn’t really need sealant. Best to do this the day before and let the sealant cure overnight.

2. Jack up the front of the car and remove the front wheels.
3. Next connect a bleeder tube to one of the caliper nipples and loosen the bleeder, then use the 2x4 slide it under the seat and move forward with the 2x4 pushing the brake pedal down like this:

4. With the 2x4 keeping the brake pedal depressed you can disconnect the hard/flex lines without losing all the brake fluid and remove the clips.
5. Next fabricate your brackets:
A. Cut two 5” lengths of the aluminum stock.
B. Each side requires a slightly different angle/position. What you do basically is stick each end about 1 “ into a vise and start hitting with a hammer to get the angle you want. With the lines disconnected you can test fit to get the right angle, and if you make a mistake you have plenty of extra material so… (see pics for reference).
C. Next mark and drill your holes (a stepped bit works well here). I did drill the lower hole a little small and used a set of files to recreate the keyed hole. But honestly, that is not necessary as you still want to use a wrench on both ends for tightening so…

6. Then just install the brackets, loosely install the hardline first, then the flex line through the hole, use the clip on the bracket to fixate the flex line, then tighten all the connections. Bleed the front lines, check for leaks, put the wheels back on and you are done.

Note: See my post further down for effects of using lube on caliper piston seals, it makes a huge difference.
So what is the result of this modification? (See pedal measurement results below) It basically brings the pedal up about a ¼ inch, which doesn’t sound like much but it does have a very noticeable improvement in feel. With this modification the brake pedal never goes below the throttle pedal (which it would do on occasion prior). The pedal is firmer and more consistent; I cannot detect any pump up at all.
Unfortunately it is not the super high/firm pedal I was raving about with the RPV’s at the MC, but is it a significant improvement? Yes absolutely.
I even removed them again just to compare back to back to be sure I was not going crazy (very easy to do). I can say that once I did that I could not wait to put them back in. If you notice your pedal is lower than you would like, and the pump up, this will definitely help.

Let me start by saying that the stock brakes on this car (MK7 Golf R) are fine for street use, but the pedal is soft, and the engagement is nonlinear making it difficult to modulate for high performance driving. Even for street driving, I prefer a firm consistent linear brake pedal. In the Macan/Brembo caliper upgrade thread (link below), some folks discovered that you could edit some of the OBD settings to reduce or turn off the brake boost and hydraulic assist. I initially tried these settings with the stock calipers, and it is a significant improvement IMO. It does provide a firmer more consistent linear brake pedal, although a bit low in the pedal travel, I highly recommend those adjustments.
https://www.golfmk.com/forums/index...brembo-upgrade-thread-read-first-post.371028/
It seems that VW purposely built in brake pedal slop so the ECU has room to regulate initial braking force pedal response using this hydraulic servo assist/booster thingy. That is why the pedal is soft and difficult to regulate (“grabby”). So when you step on the pedal the car stops well, but there is very little feel, and it is difficult to modulate. Apparently, it knows better, just step on the pedal and it will figure out how much braking force you want, for you.
When you change these settings and essentially turn off those functions, you will find that even with the stock calipers the pedal has a much firmer linear feel. However, it is also at a somewhat lower point in the pedal travel because the booster/assist is no longer affecting the initial pedal response. Again, I prefer these brake assists off and highly recommend those settings. BTW these setting do not affect the adaptive cruise control or emergency brake functions.
However, I then upgraded to the Macan Brembo calipers recommended in the thread and immediately noticed it had a somewhat negative effect to the brake pedal operation. In particular, the brake pedal travel before engagement is even lower now and the initial engagement is not quite as firm. Once you reach the engagement point it works okay, and they are linear and easy to modulate, so it is not horrible, just a bit disappointing. I also found the lower pedal will pump up all the time just during normal street use. If I let the brakes rest, with my foot off the pedal for a few seconds, it goes back to a lower pedal, but pump them quickly and the pedal is noticeably higher, does this sound familiar?
I figured it was due to a mismatch of the Master Cylinder to the upgraded calipers, and short of finding a suitable MC upgrade; there was not much to be done, so just get used to it. However, I found in some sudden emergency stop situations the added delay from the longer brake pedal travel is noticeable and can even cause a very brief moment of panic.
I started investigating what was causing this issue, and what if anything I could do to fix it. First, it is a good idea to understand what causes this issue and that starts with what causes the pistons to retract when you let off the brakes. Piston retraction is a function of the inner piston seal, see pic below:
The piston seal lives in a groove in the caliper housing, and is designed to deform a little bit as pressure builds in the caliper before it allows the piston to slide. When pressure is released, the deformed seal retracts back to its original shape, pulling the piston back with it. The deformation allows running clearance off-brake, and the sliding allows compensation for pad wear.
Most brake systems have little to no residual pressure, when you let off the brakes the pistons retract and the fluid is pushed back into the reservoir. When you apply the brakes the MC has to push enough fluid to pressurize the system and move the pistons up enough for the pads to contact the rotor before the car will even begin to brake. To help do this some performance disk brake systems use a stepped bore MC (Also referred to as a Quick take up MC, see pic below). As you can see, at the initial brake pedal movement it uses a larger piston to force a greater quantity of fluid to overcome this brake resting state. Then as you press further, the larger piston is closed off and the smaller piston provides greater force ideally at the point where the pad/rotor is fully engaged.
UPDATE: My original theory on why this works so well involved the MC being a stepped QTMC which I have discovered is not the case. After doing more research I discovered the real reason this works so well. Rather than reposting it, you can read about it here: Why and how it works
All this helps to illustrate why you have to be careful when adding larger calipers with 8 pistons or 12 depending on which BBK you choose. You want to make sure the caliper piston displacement is the same or even less than the stock calipers. Otherwise, you could end up with a much lower softer brake pedal engagement because the stock MC does not move enough fluid to pressurize and move all of those pistons in far enough for quick pad/rotor engagement. This is what can cause the need to press the brake pedal much further down before engagement giving a low and softer initial brake pedal feel. Once you get there it is fine, but by then the travel and pedal response is less than ideal.
Another factor could be the caliper type. There is a so-called standard caliper, or one that is called a “low-drag caliper” (see pic below). We have confirmed that these Macan calipers are in fact low drag calipers. They have very similar displacement to the stock calipers, but because they retract even further, more fluid is required for pad/rotor engagement, and this causes a lower/softer pedal. This is also what causes the pedal to pump up, if you pump the brake the pistons do not fully retract but when you momentarily lift off the brake pedal you pull in more fluid from the reservoir and…
This is also why you need to be careful about replacing those inner seals, and what material you choose. It can have a much bigger impact on the overall brake performance than you might think. For example, a softer material would distort more causing more piston retraction. So just changing the seals, or worn damaged heat cycled seals can significantly affect the brake pedal engagement, even if they are not leaking. This is why you want to rebuild them periodically with heavy track use, even if they are not leaking.
Here are some values for reference:
The Stock caliper piston is 60 mm giving a displacement area of 2827 mm and a retraction of .012"
The Macan caliper pistons are 42 mm giving a displacement area of 2770 mm and a retraction of .016
The ST40 caliper pistons are 34 and 40mm giving a displacement area of 2160 mm and have standard caliper retraction, I would guess around .01. This explains why the ST40 would have a nice firm high pedal. (Especially if you turn off the brake assist features)
The ST60 caliper pistons are 30, 34, 34 mm giving a displacement area of 2500 mm and standard piston retraction.
For reference:
http://www.remaninc.com/pdfs/lowdragcalipers.pdf
A low drag caliper retracts .020-.025" after the brakes are released. A regular caliper retracts about .005-.010" You would not think that's much, but with a 1" bore master cylinder that .025" on each caliper turns into almost 1/4" of piston travel at the master cylinder just to get the pads to touch the rotor. With a 6:1 pedal that is 1.5" of pedal travel before you even start to build pressure. Add the amount of pedal travel it takes to actuate the rear brakes and take up slop in the linkages, brackets, etc, and the pedal starts getting real close to the floor.
You can see it does not take much to have a big impact on pedal engagement height, as little as .25 MM of piston retraction can make a very large difference in pedal height.
So now that we know what is happening and why, what is the easiest and cheapest way to fix it? A larger or two-step quick take up master cylinder would work great. Unfortunately, I could not find one that will fit in this application, so the answer is a device known as a Residual Pressure Valve (RPV). Product description:
“A residual pressure valve ensures that you will have a high, firm pedal next time you press the brake pedal.
Ever had problems with a low spongy pedal or slow, unresponsive brakes? If so, you may need a residual pressure valve installed in your brake line. A redesidual valve acts like a one-way or check valve to maintain brake system pressure to eliminate the problems of a low spongy pedal. This 2 PSI residual valve is installed inline between the master cylinder and brake wheel cylinders to keep 2 PSI of residual 2 PSI at the wheel cylinder for disc brakes. This ensures that you will have a high, firm pedal next time you press the brake pedal.”
I initially installed these RPV’s on my car right at the MC and I have to say that it exceeded my expectations! The brake pedal was always firm and very high with outstanding modulation. The instant you touch the brake pedal the brakes are right their ready to go! It was just about perfect. This is what it looked like:
Unfortunately, I found that the stock rear calipers are not low drag and the added residual pressure was causing the rear pads to drag. Not a lot, but enough that this was not a viable long-term solution. So the alternative was to install the RPV’s in the front wheel wells to only counteract the effect of these Macan low drag calipers.
Does it work? Yes, is it as awesome as when I had them right off the MC? Sadly no, it does get you back to the stock caliper pedal height and eliminates the brake pedal pump up. So you do get a higher firmer brake pedal with good feel and modulation so definitely worth doing IMO. It is just more of a subtle improvement than the night and day difference with my initial modification, oh well. It should also help prevent pad knock which is an issue you can experience under certain track conditions (not on the street).
UPDATE!
As mentioned above, I was not entirely happy with the wheel well RPV, so I did some more testing and tinkering, and… Eureka! The short story is: all you need to do is install the RPV’s as shown below and then just lube the piston seals; that is it! The firm high pedal with instant response is back, I am extremely happy! There is much to explain and more pictures needed, but I am only allowed 10 pics per post so I will add the stage two details into one of my responses further down page one of this thread.
Here is the modification that works without causing pad drag:
Parts needed:
1. 2X 2 PSI Residual Pressure Valve (RPV) https://www.summitracing.com/parts/wil-260-13706?rrec=true
2. 1X Thread Sealant for NPT fitting https://www.summitracing.com/parts/ptx-59214
3. 2X Hydraulic Fitting Metric M10 M10X1 M10X1.0 Male Flat to Flare Steel https://www.fittings.space/gsm23-m10x10m-m10x10mf
4. 2X Male 1/8“ NPT x M10X1 M10 Female Pipe Fitting Connector Adaptor https://www.fittings.space/gbm2p-02zm-m10x10f
5. 2X EMPI 18-1102 BRAKE LINE FITTING x2 MALE 1/8"NPT FEMALE 10MM X 1.0 BUBBLE FLARE https://www.ebay.com/itm/EMPI-18-1102-BRAKE-LINE-FITTING-x2-MALE-1-8-NPT-FEMALE-10MM-X-1-0-BUBBLE-FLARE/264218456228?ssPageName=STRK:MEBIDX:IT&_trksid=p2057872.m2749.l2649
6. 1X 1 in. x 48 in. Aluminum Flat Bar with 1/8 in. Thick https://www.homedepot.com/p/Everbil...m-Flat-Bar-with-1-8-in-Thick-801927/204274000
7. 2X 7/16” to ½” by 1” bolt, nut and washer hardware store
1. $36
2. $5
3. $14
4. $14
5. $12
6. $11
7. $8
Total $100
You will also need some brake fluid, a 28” long 2 x 4, brake bleed setup, drill, metal cutting saw, sander/grinder, wrench…
Step by step:
1. Assemble the fittings onto the RPV’s using thread sealant on the NPT fittings. Keep the first 1-2 threads clean, the EMPI 18-1102 fitting is tapered so doesn’t really need sealant. Best to do this the day before and let the sealant cure overnight.
2. Jack up the front of the car and remove the front wheels.
3. Next connect a bleeder tube to one of the caliper nipples and loosen the bleeder, then use the 2x4 slide it under the seat and move forward with the 2x4 pushing the brake pedal down like this:
4. With the 2x4 keeping the brake pedal depressed you can disconnect the hard/flex lines without losing all the brake fluid and remove the clips.
5. Next fabricate your brackets:
A. Cut two 5” lengths of the aluminum stock.
B. Each side requires a slightly different angle/position. What you do basically is stick each end about 1 “ into a vise and start hitting with a hammer to get the angle you want. With the lines disconnected you can test fit to get the right angle, and if you make a mistake you have plenty of extra material so… (see pics for reference).
C. Next mark and drill your holes (a stepped bit works well here). I did drill the lower hole a little small and used a set of files to recreate the keyed hole. But honestly, that is not necessary as you still want to use a wrench on both ends for tightening so…
6. Then just install the brackets, loosely install the hardline first, then the flex line through the hole, use the clip on the bracket to fixate the flex line, then tighten all the connections. Bleed the front lines, check for leaks, put the wheels back on and you are done.
Note: See my post further down for effects of using lube on caliper piston seals, it makes a huge difference.
So what is the result of this modification? (See pedal measurement results below) It basically brings the pedal up about a ¼ inch, which doesn’t sound like much but it does have a very noticeable improvement in feel. With this modification the brake pedal never goes below the throttle pedal (which it would do on occasion prior). The pedal is firmer and more consistent; I cannot detect any pump up at all.
Unfortunately it is not the super high/firm pedal I was raving about with the RPV’s at the MC, but is it a significant improvement? Yes absolutely.
I even removed them again just to compare back to back to be sure I was not going crazy (very easy to do). I can say that once I did that I could not wait to put them back in. If you notice your pedal is lower than you would like, and the pump up, this will definitely help.
Last edited:
")
 Uh,, dammit Mini7 where were you when I was planning this modification?